Hello World: Browser plugin
I just tested building a browser plugin, it was easier than I thought. Here I'll walk you through the steps of creating a minimal working example of a browser plugin, a.k.a. the "Hello World" of browser plugins.
First of all there are two main browser platforms out there, Chromium and Mozilla. They do some things a little differently, but similar enough that we can build a plugin that works on both. This plugin will work in both, I'll describe the firefox version, but the chromium version is very similar.
What is a browser plugin?
Simply put, a browser plugin is a program that runs in the browser. It can do things like modify the content of a webpage, or add new functionality to the browser. It's a way to extend the browser with custom functionality. Common examples are ad blockers, password managers, and video downloaders.
In technical terms, they are plugins that can insert html-css-js into your browser experience.
How to build a browser plugin
Step 0: Basics
You'll need a computer, a text editor and a browser. For testing and development I personally think that the firefox developer edition is the easiest to work with. But any Chrome based browser will also do.
Create a working directory on your computer, name it anything you like. I'll call mine hello-world-browser-plugin. Open the directory and create a file called manifest.json. This is the most important file of your plugin, and it must be named exactly right.
Step 1: manifest.json
After creation open your file manifest.json in your text editor and paste the following code:
{
    "manifest_version": 3,
    "name": "Hello World",
    "version": "1.0",
    "description": "A simple 'Hello World' browser extension",
    "content_scripts": [
        {
        "matches": ["<all_urls>"],
        "js": ["hello.js"]  //The name of your script file.
        // "css": ["hello.css"]  //The name of your css file.
        }
    ]
}
If you wonder what the json file format is, it's a normal text file with a special syntax such that a computer can easily read it. It's the json syntax you see in the code above. Let's go through what's being said here. (If you are not interested, just skip to the next step after pasting this we are done here.)
manifest_version: This is the version of the manifest file format. It's currently at version 3, and it's the latest version. It's important that you set this to 3, otherwise your plugin won't work.name: This is the name of your plugin. It can be anything you like.version: This is the version of your plugin. It can be anything you like.description: This is the description of your plugin. It can be anything you like.content_scripts: This is where you define what your plugin does. It's a list of scripts that will be executed when the browser loads a webpage. In this case we have one script, calledhello.js. It's the script that we'll create in the next step.matches: This is a list of urls that the script will be executed on. In this case we have<all_urls>, which means that the script will be executed on all urls. You can also specify a specific url, likehttps://brave.com/*, which means that the script will only be executed on urls that start withhttps://brave.com/.js: This is a list of javascript files that will be executed. In this case we have one file, calledhello.js. It's the script that we'll create in the next step.css: This is where you can add a list of css files that will be executed. In this case we have none, but you can add css files here if you want to.//: Text following these two characters are comments. They are ignored by the computer, You can add comments anywhere you like, and they are a good way to document your code.
Step 2: hello.js
Now it's time to create another file in your project folder. This time we'll call it hello.js. When created, open it in your text editor and paste the following code:
console.log("Hello World!");
console.log statement, which will print the text "Hello World!" to the console. The console is a place where the browser prints out messages, and it's a good place to start when debugging your plugin.
Step 3: Load and launch your plugin
Firefox
Now it's time to load your plugin into your browser. Open your browser and go to the url about:debugging#/runtime/this-firefox. You should see a page that looks something like this: 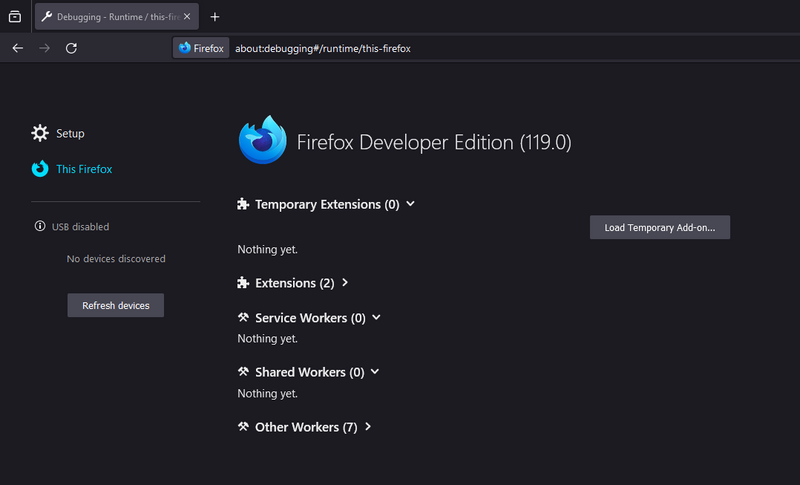
Click the button that says "Load Temporary Add-on...". A file dialog will open, navigate to your project folder and select the file manifest.json. Your plugin should now be loaded and running.
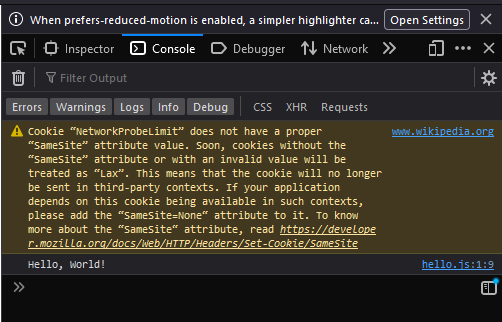
Go to a website, any website, and open the inspector then navigate to the console. You'll find the inspector by right-clicking anywhere within the webpage, and click "Inspector" in the drop-down menu. When opening the console you might see some log messages from the site you visited and... you should see the text "Hello World!" printed there, from our little plugin! Congratulations!
Chrome
Open your browser and go to the url chrome://extensions/. Click the button that says "Load unpacked". A file dialog will open, navigate to your project folder and select the folder hello-world-browser-plugin. Your plugin should now be loaded and running.
Note the difference, of selecting the file manifest.json in firefox, and selecting the folder hello-world-browser-plugin in chrome. Otherwise, the process is the same. So I'll repeat the same text as above: (for those who skipped ahead..)
Go to a website, any website, and open the inspector then navigate to the console. You'll find the inspector by right-clicking anywhere within the webpage, and click "Inspector" in the drop-down menu. When opening the console you might see some log messages from the site you visited and... you should see the text "Hello World!" printed there, from our little plugin! Congratulations!
As you can see this isn't as complicated as one might think. Having preformed a "Hello-World!"-project is a very useful and valuable first step. These setup steps are the basics for any browser plugin, and you can build on this to create more advanced plugins.